Wednesday, 21 January 2015
Sunday, 13 July 2014
MEASUREMENT OF AREAS AND VOLUMES..
How much does Sam earn cutting this area:
Part A is a square:
Area of A = a2 = 20m × 20m = 400m2
Part B is a triangle. Viewed sideways it has a base of 20m and a height of 14m.
Area of B = ½b × h = ½ × 20m × 14m = 140m2
So the total area is:
Area = Area of A + Area of B = 400m2 + 140m2 = 540m2
Sam earns $0.10 per square meter
Sam earns = $0.10 × 540m2 = $54
Example: What is the area of this rectangle?
The formula is:
Area = w × h
w = width
h = height
w = width
h = height
We know w = 5 and h = 3, so:
Area = 5 × 3 = 15
Example: What is the area of this circle?
Radius = r = 3
| Area | = π × r2 | |
| = π × 32 | ||
| = π × (3 × 3) | ||
| = 3.14159... × 9 | ||
| = 28.27 (to 2 decimal places) |
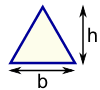
Example: What is the area of this triangle?
Height = h = 12
Base = b = 20
Area = ½ × b × h = ½ × 20 × 12 = 120
Area = π × r2
Circumference = 2 × π × r
r = radius
Circumference = 2 × π × r
r = radius
Ellipse
Area = πab
Parallelogram
Area = b × h
b = base
h = vertical height
Rectangle
Area = w × h
w = widthh = height
Sector
Area = ½ × r2 × θ
r = radiusθ = angle in radians
Square
Area = a2
a = length of side Trapezoid (US)
Trapezium (UK)
Area = ½(a+b) × h
h = vertical height Triangle
Area = ½ × b × h
b = baseh = vertical height

Note: h is at right angles to b:
Cement Manufacturing Process.
![]() |
| Manufacturing Process |
Cement is a fine powder which sets after a few hours when mixed with water, and then hardens in a few days into a solid, strong material. Cement is mainly used to bind fine sand and coarse aggregates together in concrete. Cement is a hydraulic binder, i.e. it hardens when water is added.
There are 27 types of common cement which can be grouped into 5 general categories and 3 strength classes: ordinary, high and very high. In addition, some special cements exist like sulphate resisting cement, low heat cement and calcium aluminate cement.
The quarry is the starting point
Cement plants are usually located closely either to hot spots in the market or to areas with sufficient quantities of raw materials. The aim is to keep transportation costs low. Basic constituents for cement (limestone and clay) are taken from quarries in these areas.
A two-step process
Basically, cement is produced in two steps: first, clinker is produced from raw materials. In the second step cement is produced from cement clinker. The first step can be a dry, wet, semi-dry or semi-wet process according to the state of the raw material.
Making clinker
The raw materials are delivered in bulk, crushed and homogenised into a mixture which is fed into a rotary kiln. This is an enormous rotating pipe of 60 to 90 m long and up to 6 m in diameter. This huge kiln is heated by a 2000°C flame inside of it. The kiln is slightly inclined to allow for the materials to slowly reach the other end, where it is quickly cooled to 100-200°C.
Four basic oxides in the correct proportions make cement clinker: calcium oxide (65%), silicon oxide (20%), alumina oxide (10%) and iron oxide (5%). These elements mixed homogeneously (called “raw meal” or slurry) will combine when heated by the flame at a temperature of approximately 1450°C. New compounds are formed: silicates, aluminates and ferrites of calcium. Hydraulic hardening of cement is due to the hydration of these compounds.
The final product of this phase is called “clinker”. These solid grains are then stored in huge silos. End of phase one.
From clinker to cement
The second phase is handled in a cement grinding mill, which may be located in a different place to the clinker plant. Gypsum (calcium sulphates) and possibly additional cementitious (such as blastfurnace slag, coal fly ash, natural pozzolanas, etc.) or inert materials (limestone) are added to the clinker. All constituents are ground leading to a fine and homogenous powder. End of phase two. The cement is then stored in silos before being dispatched either in bulk or bagged.
Municipal Waste Water Applications.
Primary Water Treatment process consists in removing large suspended organic solids.
This is usually accomplished by sedimentation in settling basins.
The liquid effluent from primary treatment, often contains a large amount of suspended organic materials, and has a high BOD ( Biological oxygen demand ) ( about 60 % of original)
Sometimes, the preliminary as well as primary water treatments are classified together,
under primary water treatment.
The organic solids, which are separated out in the sedimentation tanks ( in primary water treatment) are often stabilized by Anaerobic decomposition in a Digestion Tank or incinerated. the residue is used for land fills or soil conditioners.
How To Identify a Good Brick.
5 Characteristics of Good Bricks – How To Identify a Good Brick:
1.Bricks should be of same color, size and shape.
2.Collision of 2 good bricks will produce a metal sound.
3.A good brick won’t break if it is given to fall from approximate 1 meter height.
4.The upper surface of the brick should be plane and without any crack.
5.Bricks should be soaked into water for atleast 12 hours.
1.Bricks should be of same color, size and shape.
![]() |
| Brick(190*90*90) |
2.Collision of 2 good bricks will produce a metal sound.
3.A good brick won’t break if it is given to fall from approximate 1 meter height.
4.The upper surface of the brick should be plane and without any crack.
5.Bricks should be soaked into water for atleast 12 hours.
7 Test to Justify Brick Quality
To know the quality of bricks following 7 tests can be performed. In these tests some are performed in laboratory and the rest are on field.
- Compressive strength test
- Water Absorption test
- Efflorescense test
- Hardness test
- Size, Shape and Color test
- Soundness test
- Structure test
Compressive strength test: This test is done to know the compressive strength of brick. It is also called crushing strength of brick. Generally 5 specimens of bricks are taken to laboratory for testing and tested one by one. In this test a brick specimen is put on crushing machine and applied pressure till it breaks. The ultimate pressure at which brick is crushed is taken into account. All five brick specimens are tested one by one and average result is taken as brick's compressive/crushing strength.
Water Absorption test: In this test bricks are weighed in dry condition and let them immersed in fresh water for 24 hours. After 24 hours of immersion those are taken out from water and wipe out with cloth. Then brick is weighed in wet condition. The difference between weights is the water absorbed by brick. The percentage of water absorption is then calculated.
The less water absorbed by brick the greater its quality. Good quality brick doesn't absorb more than 20% water of its own weight.
Efflorescense test: The presence of alkalies in bricks is harmful and they form a gray or white layer on brick surface by absorbing moisture. To find out the presence of alkalis in bricks this test is performed. In this test a brick is immersed in fresh water for 24 hours and then it's taken out from water and allowed to dry in shade.
If the whitish layer is not visible on surface it proofs that absence of alkalis in brick. If the whitish layer visible about 10% of brick surface then the presence of alkalis is in acceptable range. If that is about 50% of surface then it is moderate. If the alkalis's presence is over 50% then the brick is severely affected by alkalies
Hardness test: In this test a scratch is made on brick surface with a hard thing. If that doesn't left any impression on brick then that is good quality brick.
Size, shape and color test: In this test randomly collected 20 bricks are staked along lengthwise, widthwise and heightwise and then those are measured to know the variation of sizes as per standard. Bricks are closely viewed to check if its edges are sharp and straight and uniform in shape. A good quality brick should have bright and uniform color throughout.
Soundness test: In this test two bricks are held by both hands and struck with one another. If the bricks give clear metallic ringing sound and don't break then those are good quality bricks.
Structure test: In this test a brick is broken or a broken brick is collected and closely observed. If there are any flows, cracks or holes present on that broken face then that isn't good quality brick.
Water Absorption test: In this test bricks are weighed in dry condition and let them immersed in fresh water for 24 hours. After 24 hours of immersion those are taken out from water and wipe out with cloth. Then brick is weighed in wet condition. The difference between weights is the water absorbed by brick. The percentage of water absorption is then calculated.
The less water absorbed by brick the greater its quality. Good quality brick doesn't absorb more than 20% water of its own weight.
Efflorescense test: The presence of alkalies in bricks is harmful and they form a gray or white layer on brick surface by absorbing moisture. To find out the presence of alkalis in bricks this test is performed. In this test a brick is immersed in fresh water for 24 hours and then it's taken out from water and allowed to dry in shade.
If the whitish layer is not visible on surface it proofs that absence of alkalis in brick. If the whitish layer visible about 10% of brick surface then the presence of alkalis is in acceptable range. If that is about 50% of surface then it is moderate. If the alkalis's presence is over 50% then the brick is severely affected by alkalies
Hardness test: In this test a scratch is made on brick surface with a hard thing. If that doesn't left any impression on brick then that is good quality brick.
Size, shape and color test: In this test randomly collected 20 bricks are staked along lengthwise, widthwise and heightwise and then those are measured to know the variation of sizes as per standard. Bricks are closely viewed to check if its edges are sharp and straight and uniform in shape. A good quality brick should have bright and uniform color throughout.
Soundness test: In this test two bricks are held by both hands and struck with one another. If the bricks give clear metallic ringing sound and don't break then those are good quality bricks.
Structure test: In this test a brick is broken or a broken brick is collected and closely observed. If there are any flows, cracks or holes present on that broken face then that isn't good quality brick.
Advantages and Disadvantages of Raft Foundation.
Advantages and Disadvantages of Raft Foundation:
Raft Foundation:
Mat or raft foundation is a large slab supporting a number of columns and walls under the entire structure or a large part of the structure to lower the contact pressure compared to spread footing.
When Mat/Raft Foundation is Recommended:
- It is recommended for the following purposes.
- Bearing capacity of soil is low,
- walls of the structure are so close that individual footings would overlap,
- it is used for large loads,
- individual footings would cover more than about half of the construction area.
Advantages of Raft Foundation:
- It has many advantages as well as disadvantages. The advantages of raft foundation are as follows,
- Raft or mat foundation is economic due to combination of foundation and floor slab.
- It requires little excavation.
- It can cope with mixed or poor ground condition.
- It reduces differential settlement.
Disadvantages of Raft Foundation:
- It has some disadvantages also. The disadvantages of raft foundation include the following.
- Mat foundation requires specific treatment for point loads.
- Edge erosion occurs if not treated properly.
![]() |
| Mat Foundation |
![]() |
| Raft Foundation |
As per the National Building Code of India 2005.
As per the National Building Code of India 2005, the height of all rooms for human habitation
shall not be less than 2.75 m measured from the surface of the floor to the lowest point of the ceiling
(bottom of the slab). In the case of a pitched roof, the average height of rooms shall not be less than 2.75 m.
The minimum clear head room under a beam, folded plates or eves shall be 2.4 m. In the case of air-conditioned
rooms, a height of not less than 2.4 m measured from the surface of the floor to the lowest point of air-conditioning
duct or the false ceiling shall be provided. For kitchens it is 2.75m, bathrooms 2.1m, lofts 2.2m,
mezzanine floors 2.2m, store rooms 2.2m, and basements 2.4 m.
The ceiling heights for educational buildings is 3.6 m (cold regions 3m) and forindustrial buildings it is 3.6 m
(when air-conditioned, 3 m). Architects design rooms and halls keeping in mind the volume of space, ventilation
and natural lighting requirements and not just the plan sizes.
One has to visualise it in three dimensions before finalising the heights.
A building can have same ceiling height throughout or it can have higher heights for living areas
by providing split levels and double heights.
A lot of research and survey has been conducted the world over to decide on the ceiling heights!
It all finally depends on the comfort of the user.
Ceiling Heights Depend on Following factors.
The ceiling heights depend on many factors:
Clearance: Should be comfortable for the tallest individual and depends on the type of ceiling fixtures
such as lights, fans, ornamental hangings and so on. Clear and safe head room below these fixtures is very important.
Temperature: Thermal comfort and radiation from the ceilings are important points. If there is a mechanism to control
the radiation, it is better to have a higher ceiling height.
Ventilation: Higher ceiling heights will have better air circulation but it can also be achieved by proper design and placement
of windows and ventilators.
Light and sound: Lower ceilings will necessitate more windows and ventilators for better light and sound effects.
Economics: Lower ceilings will be cost effective as there is savings in the construction materials and it is possible to build more storeys.
Wednesday, 12 February 2014
How to Install Ceiling Tiles.
Here are tips and general instructions on installing ceiling tiles. They can help you save time and effort once you begin the job.
Be sure to follow manufacturer's instructions for installation, particularly if you're using cement or adhesive. Inside this document you will find information about:SELECTING THE RIGHT TILES
| |
DETERMINING HOW TO APPLY TILES
| |
FOLLOW THESE THREE BASIC RULES
| ||
HOW TO DETERMINE THE SIZE OF BORDER TILES
|
APPLYING TILE WITH ADHESIVES
| |
INSTALLING TILES ON WOOD FURRING STRIPS |
| |
INSTALLING THE FURRING STRIPS
|
STAPLING TILES TO FURRING STRIPS
| |
TILING AROUND POSTS OR PIPES
|
Friday, 14 September 2012
How to Prepare Concrete for Waterproofing |
Waterproofing :
Waterproofing concrete is important to protect the surface from excessive moisture. When water seeps into concrete, the concrete expands and contracts due to cycles of freezing and thawing. Cracks and holes may form as a result. Waterproofing will help protect against this problem. Waterproofing sealant cannot be applied to concrete that has not been properly prepared. Preparing concrete for waterproofing is an important step in ensuring that the waterproofing sealer works properly.
Instruction(Preparation for waterproofing):
-
Allow new concrete to cure for a minimum of seven days before waterproofing. Repair any damaged areas of the concrete. Fill in cracks or holes with a concrete patching compound.
- Scrub the concrete with a dry, stiff brush to loosen any lodged dirt or debris. Follow up by sweeping the concrete with a broom. If you're waterproofing concrete walls, use the soft brush attachment on a vacuum cleaner rather than a broom.
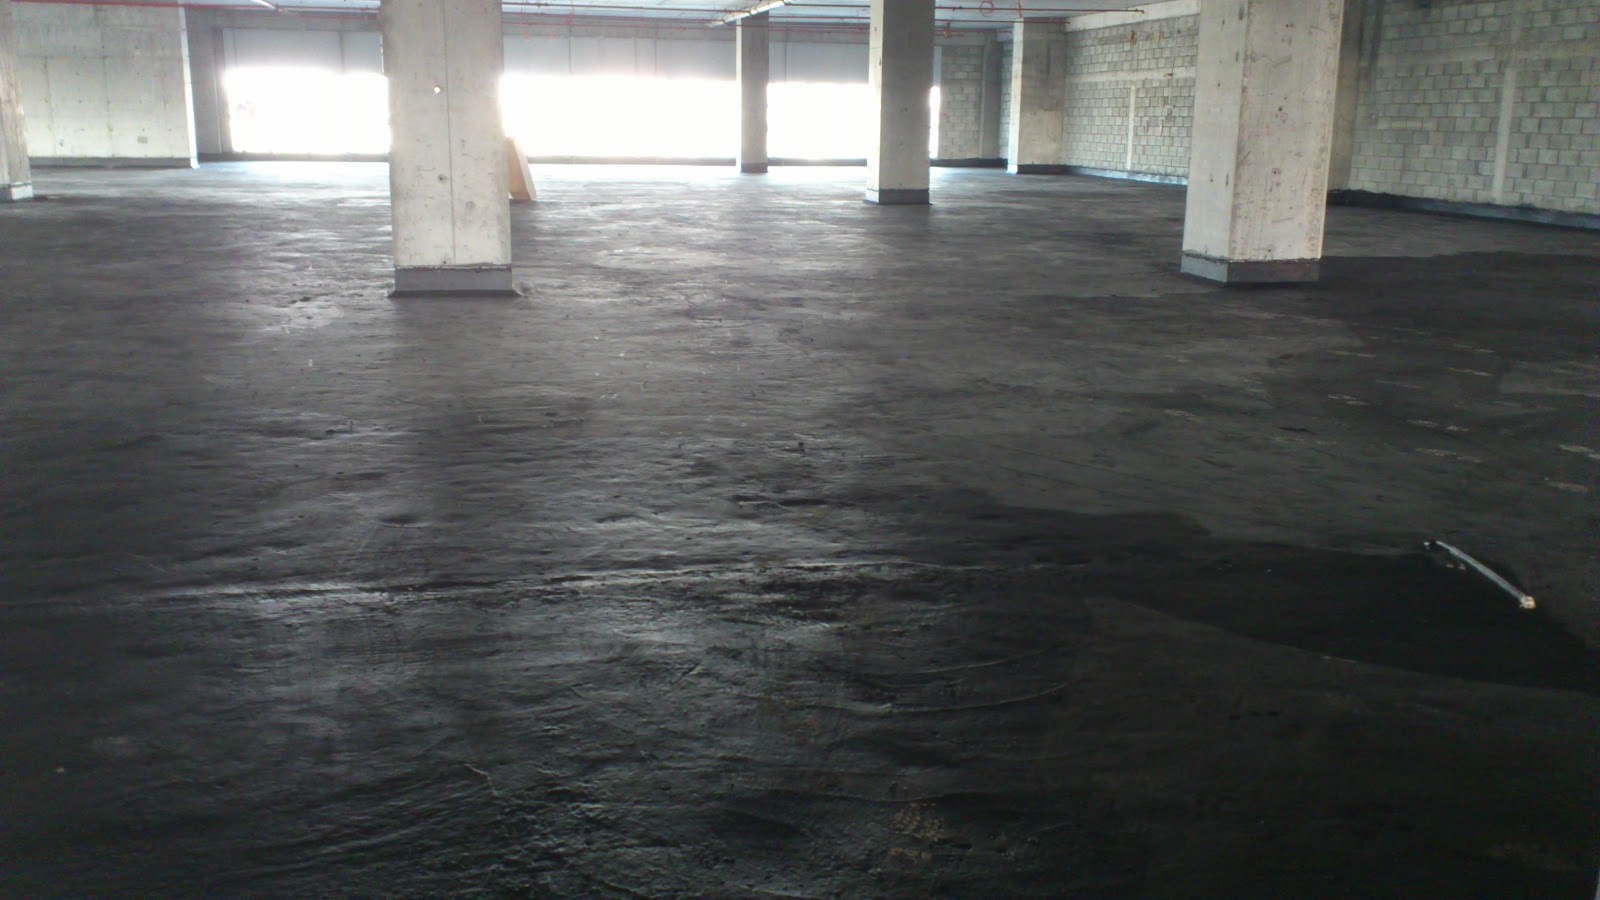
- Simple way , with the help of chipping hammer remove spawl or spall i.e ( However, all concrete construction has one problem in common. A flaking, crumbling part of the surface, called a spawl or spall, is an early warning sign that concrete repairs are required. Repair a concrete spawl immediately to minimize the extent and expense of the work.) than a thin plaster (2-4mm) is needed for closing small holes and making surface smooth as shown in pic 1 and 2. This method I used in Novotel and Ibis Hotel.
How to Repair a Concrete Spawl:
![]() |
| Concrete spawl |
Concrete is an inexpensive construction material that has been used for
more than two thousand years. Domes, columns, beams, slabs, sidewalks
and backyard patios are made of concrete. With proper care and use,
concrete construction can last several lifetimes. However, all concrete
construction has one problem in common. A flaking, crumbling part of the
surface, called a spawl or spall, is an early warning sign that
concrete repairs are required. Repair a concrete spawl immediately to
minimize the extent and expense of the work. Choose repair materials to
match requirements of the installation.
Instruction: (Causes and Repair)
Determine the cause of the spawl. Moisture is the most common problem. Other causes include impact, overloading, exposure to chemicals or too much water in the original concrete mix. Eliminate these problems wherever possible to extend the life of the repair. Test new concrete at the time of placement to confirm that the mix contains the specified amount of water.
Remove the damaged concrete. Establish a perimeter around the damaged area by cutting into the concrete at the depth recommended by the manufacturer of the repair material. Use a saw specifically designed for cutting concrete, such as a Hilti handheld gas saw. .
Clean the exposed surfaces. Sandblast or power wash concrete and reinforcing steel to remove all loose materials, dust particles and rust. Vacuum clean.
Filling a small crack with pourable grout:
Cut the tip off the grout container to create a hole a little smaller than the width of the crack. Pour in the grout to fill the crack.
For deep cracks, pour in the grout one layer at a time and allow complete drying between layers.
Filling a large crack:
For cracks wider than about 1/2 inch (12 mm), use a mason's hammer and chisel to cut the crack so it is wider below the surface than at the surface, a process called undercutting. Undercutting prevents the patchi material from being forced out in response to temperature changes.
Mix vinyl concrete patcher with water as directed. Press the material into the crack with a mason's trowel in layers no more than 1/4 inch (6 mm) thick. Allow each layer to dry completely before applying the next.
Using a steel trowel, wood float (a wood block with a handle), broom or brush, finish and texture the surface to match the surrounding area. A steel trowel gives the smoothest surface; hold it flat and use a swirling motion.
Using DPC ( Damp Proof Course ) for waterproofing :
1) Waterproof, dampproof, ageing-resistant, leakproof
2) No flowing at highest temperature and no crack at
A damp proof course ( DPC ) is a physical barrier inserted into the fabric of a building to stop water passing from one place to another.
This can be on a horizontal plane, stopping water rising up from the ground by being sucked up by the dry masonry above, or vertically to stop water passing from the outside of a building, though the masonry, to the inside.
DPC's have taken many forms through the ages and one of the earliest forms was to use a layer of slate in the construction.
Slate is still used but the less expensive plastic version ( below right ) is now more widely used.
Benefits of DPC :
- Fully Inert & Unaffected by LOSP Timber treatments
- High Strength
- Extreme Durability
| Fixing Membrene |
Using DPM ( Damp Proof Membrane ) for waterproofing :
DPM is a liquid applied damp-proof membrane (DPM) that can be used to resist the penetration of gases, vapours and liquids. It is based on a blend of polymers which provide integrity, elasticity and toughness to the formed film. Drybase Liquid Applied DPM is supplied ready for use and is applied in two coats by brush, roller, or airless spray.
Because Drybase Liquid Applied DPM does not contain any bitumen it
will not give off the "bitumen odour" that is associated with certain
bitumen-based products - resulting in fewer complaints from homeowners.
Note- Before fixing membrane need dumer/primer as shown in pic 1.1 and 1.2
Subscribe to:
Posts (Atom)


.jpg)