Friday 14 September 2012

How to Prepare Concrete for Waterproofing |

Waterproofing :

Waterproofing concrete is important to protect the surface from excessive moisture. When water seeps into concrete, the concrete expands and contracts due to cycles of freezing and thawing. Cracks and holes may form as a result. Waterproofing will help protect against this problem. Waterproofing sealant cannot be applied to concrete that has not been properly prepared. Preparing concrete for waterproofing is an important step in ensuring that the waterproofing sealer works properly.


Instruction(Preparation for waterproofing):

  1. Allow new concrete to cure for a minimum of seven days before waterproofing. Repair any damaged areas of the concrete. Fill in cracks or holes with a concrete patching compound.
  2. Scrub the concrete with a dry, stiff brush to loosen any lodged dirt or debris. Follow up by sweeping the concrete with a broom. If you're waterproofing concrete walls, use the soft brush attachment on a vacuum cleaner rather than a broom.
  3. Simple way , with the help of chipping hammer remove spawl or spall i.e (  However, all concrete construction has one problem in common. A flaking, crumbling part of the surface, called a spawl or spall, is an early warning sign that concrete repairs are required. Repair a concrete spawl immediately to minimize the extent and expense of the work.) than a thin plaster (2-4mm) is needed for closing small holes and making surface smooth as shown in pic 1 and 2.  This method I used in Novotel and Ibis Hotel.


    after repaired spawl pic 1
    pic2

How to Repair a Concrete Spawl:

Concrete spawl
Concrete is an inexpensive construction material that has been used for more than two thousand years. Domes, columns, beams, slabs, sidewalks and backyard patios are made of concrete. With proper care and use, concrete construction can last several lifetimes. However, all concrete construction has one problem in common. A flaking, crumbling part of the surface, called a spawl or spall, is an early warning sign that concrete repairs are required. Repair a concrete spawl immediately to minimize the extent and expense of the work. Choose repair materials to match requirements of the installation.


Instruction: (Causes and Repair)

  1. Determine the cause of the spawl. Moisture is the most common problem. Other causes include impact, overloading, exposure to chemicals or too much water in the original concrete mix. Eliminate these problems wherever possible to extend the life of the repair. Test new concrete at the time of placement to confirm that the mix contains the specified amount of water.

  2.  Remove the damaged concrete. Establish a perimeter around the damaged area by cutting into the concrete at the depth recommended by the manufacturer of the repair material. Use a saw specifically designed for cutting concrete, such as a Hilti handheld gas saw. .

  3. Clean the exposed surfaces. Sandblast or power wash concrete and reinforcing steel to remove all loose materials, dust particles and rust. Vacuum clean.

    Filling a small crack with pourable grout:

    1.  Cut the tip off the grout container to create a hole a little smaller than the width of the crack. Pour in the grout to fill the crack.

    2. For deep cracks, pour in the grout one layer at a time and allow complete drying between layers.

    Filling a large crack:

    1. For cracks wider than about 1/2 inch (12 mm), use a mason's hammer and chisel to cut the crack so it is wider below the surface than at the surface, a process called undercutting. Undercutting prevents the patchi material from being forced out in response to temperature changes.

    2. Mix vinyl concrete patcher with water as directed. Press the material into the crack with a mason's trowel in layers no more than 1/4 inch (6 mm) thick. Allow each layer to dry completely before applying the next.

    3. Using a steel trowel, wood float (a wood block with a handle), broom or brush, finish and texture the surface to match the surrounding area. A steel trowel gives the smoothest surface; hold it flat and use a swirling motion.


Using DPC ( Damp Proof Course ) for waterproofing :

1) Waterproof, dampproof, ageing-resistant, leakproof 
2) No flowing at highest temperature and no crack at  

 A damp proof course ( DPC ) is a physical barrier inserted into the fabric of a building to stop water passing from one place to another. 

This can be on a horizontal plane, stopping water rising up from the ground by being sucked up by the dry masonry above, or vertically to stop water passing from the outside of a building, though the masonry, to the inside. 

DPC's have taken many forms through the ages and one of the earliest forms was to use a layer of slate in the construction.

Slate is still used but the less expensive plastic version ( below right ) is now more widely used. 

Benefits of DPC :

  • Fully Inert & Unaffected by LOSP Timber treatments
  • High Strength
  • Extreme Durability


2nd Coat of DPC
1st coat of DPC

Fixing Membrene

Using DPM ( Damp Proof Membrane ) for waterproofing :  

DPM is a liquid applied damp-proof membrane (DPM) that can be used to resist the penetration of gases, vapours and liquids.  It is based on a blend of polymers which provide integrity, elasticity and toughness to the formed film. Drybase Liquid Applied DPM is supplied ready for use and is applied in two coats by brush, roller, or airless spray.  

Because Drybase Liquid Applied DPM does not contain any bitumen it will not give off the "bitumen odour" that is associated with certain bitumen-based products - resulting in fewer complaints from homeowners.

Note- Before fixing membrane need dumer/primer as shown in pic 1.1 and 1.2

Benefits of DPM :

  • Easy to apply

  • Supplied ready for use

  • Available in black or white                                                 

  • Gas barrier (radon, carbon dioxide, methane)

  • Water-based

  • Quick drying

  • Damp-proof barrier

  • Bitumen-free, low-odour formulation

Primer pic1.1
pic 1.2

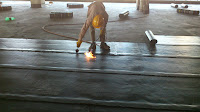
Fixing membrane in Health Club


Friday 31 August 2012

About Units And Calculations:

CONVERSION OF UNITS :

1m = 100 cm = 1000 mm = 39.37 inches = 3.28 foot


1foot = 12 inches

1 inch = 2.54 cm = 25.4 mm

1 yard = 36 inches

1 cm = 0.3937 inch = 10 mm


Conversion of Temperature :

Celsius 0 = 32 Farenheit

Farenheit 0 = -17.77 Celsius

Kelvin 0 = -273.15 Celsius

Farenheit 0 = 255.375 Kelvin

http://www.unitconverters.net/ 


Calculation of Steel :


Definition of acoustic layer and their used in civil.

 Acoustic material:

Any material considered in terms of its acoustical properties. Commonly and especially, a material designed to absorb sound.

It is particularly suited to the following developments:
• Luxury apartments
• Penthouses
• Hotels
• Schools
• Hospitals
• Libraries
• Retail
• Music studios

Features & benefits:

•Excellent impact and airborne performance
•Offers long term performance without collapse or
“bottoming” out under high point loads
•Quick and easy to install with no need for separate
perimeter strips
•Minimises construction heights
•Supplied in easy to handle sheets
•Mildew and moisture proof
•Zero global warming potential (GWP) and zero ozone
depletion potential (ODP)

Technical Information: 

Sheet length = 2250mm
Sheet width = 1150mm
Material thickness= 5mm

Density                                                           =720kg/m3
Tensile strength (DIN 53571)                         =approx 0.5N/mm2
Thermal conductivity approx                          =0.14W/mK
Elongation at break approx.                           =75%
Temperature resistance                                 =-40ºC to +110ºC
Airborne sound insulation (DnT,w + Ctr)        = 49dB
Impact sound insulation (L’nT,w (Ci))             =46dB
ô€€€LW (impact improvement)                          =20dB (BS EN ISO 140-8:1998)

Remember this technical information only for 5mm thick acoustic layer.


acoustic 


Acoustic impedance

Acoustic impedance: Z=R+jX ; [ML-4T-1] ; mks acoustic ohm *(Pa•s/m3) ---of a surface, for a given frequency, the complex quotient obtained when the sound pressure averaged over the surface is divided by the volume velocity through the surface. The real and imaginary components are called, respectively, acoustic resistance and acoustic reactance.

http://en.wikipedia.org/wiki/Acoustic_impedance


ABOUT GYPSUM BOARD USED IN CEILING & WALLS.


THE MINERAL GYPSUM

  • Chemistry: CaSO4-2(H2O), Hydrated Calcium Sulfate
  • Class: Sulfates
  • Uses: plaster, wall board, some cements, fertilizer, paint filler, ornamental stone, etc..
  • Specimens
  • Gypsum is one of the more common minerals in sedimentary environments. It is a major rock forming mineral that produces massive beds, usually from precipitation out of highly saline waters. Since it forms easily from saline water, gypsum can have many inclusions of other minerals and even trapped bubbles of air and water.
  • Gypsum has several variety names that are widely used in the mineral trade.
  • "Selenite" is the colorless and transparent variety that shows a pearl like luster and has been described as having a moon like glow. The word selenite comes from the greek for Moon and means moon rock.
  • Another variety is a compact fiberous aggregate called "satin spar" . This variety has a very satin like look that gives a play of light up and down the fiberous crystals.
  • A fine grained massive material is called "alabaster" and is an ornamental stone used in fine carvings for centuries, even eons.                  
  • Crystals of gypsum can be extremely colorless and transparent, making a strong contrast to the most common usage in drywall. The crystals can also be quite large. Gypsum is a natural insulator, feeling warm to the touch when compared to a more ordinary rock or quartz crystal. Sheets of clear crystals can be easily peeled from a a larger specimen.
  • Gypsum crystals can be extremely large - among the largest on the entire planet. A cave in Naica, Mexico contains crystals that dwarf the people inside. Apparently, ideal conditions for the slow growth of gypsum were maintained for thousands of years, allowing a few crystals to grow to enormous sizes. Click on the photos for larger images, and see this abstract for an article in the April 2007 Geology magazine that describes how the growth of these gypsum megacrystals occurred.
  • Plaster of Paris is made by heating gypsum to about 300 degrees Fahrenheit, driving 75% of the water out of the mineral.  This reaction absorbs energy, enabling a sheet of drywall to resist fire for a while. Heating further to about 350 degrees F drives out the remaining water and results in conversion to the mineral anhydrite.
   

Physical Characteristic

  • Color is usually white, colorless or gray, but can also be shades of red, brown and yellow.
  • Luster is vitreous to pearly especially on cleavage surfaces.
  • Transparency crystals are transparent to translucent.
  • Crystal System is monoclinic; 2/m
  • Crystal Habits include the tabular, bladed or blocky crystals with a slanted parallelogram outline. The pinacoid faces dominate with jutting prism faces on the edges of the tabular crystals. Long thin crystals show bends and some specimens bend into spirals called "Ram's Horn Selenite" Two types of twinning are common and one produces a "spear head twin" or "swallowtail twin" while the other type produces a "fishtail twin". Also massive, crusty, granular, earthy and fiberous.
  • Cleavage is good in one direction and distinct in two others..
  • Fracture is uneven but rarely seen.
  • Hardness is 2 and can be scratched by a fingernail.
  • Specific Gravity is approximately 2.3+ (light)
  • Streak is white.
  • Associated Minerals are halite, calcite, sulfur, pyrite, borax and many others.
  • Other Characteristics: thin crystals are flexible but not elastic, meaning they can be bent but will not bend back on their own. Also some samples are fluorescent. Gypsum has a very low thermal conductivity (hence it's use in drywall as an insulating filler). A crystal of Gypsum will feel noticeably warmer than a like crystal of quartz.
  • Notable Occurances include Naica, Mexico; Sicily; Utah and Colorado, USA; and many other locallities throughout the world.
  • Best Field Indicators are crystal habit, flexible crystals, cleavage and hardness.

 How to fix Gypsum Boad for partation of Walls  or Ceiling:


  • Gypsum board is often called drywall, wallboard, or plasterboard. It differs from other panel-type building products, such as plywood, hardboard, and fiberboard, because of its noncombustible core and paper facers. When joints and fastener heads are covered with a joint compound system, gypsum wall board creates a continuous surface suitable for most types of interior decoration.
  • Advantages of Gypsum Board Construction:

    Gypsum board walls and ceilings have a number of outstanding advantages:
    ◦ Ease of installation
    ◦ Fire resistance
    ◦ Sound isolation
    ◦ Durability
    ◦ Economy
    ◦ Versatility

    Common Types of Gypsum Board in Alphabetical Order:

    Abuse-resistant gypsum panels offer greater resistance to surface indentation, abrasion and penetration than standard gypsum panels.
    Eased edge gypsum board, which has a tapered and slightly rounded or beveled factory edge. It may be used as an aid in custom finishing of joints.
    Exterior gypsum soffit board is board designed for use on the undersides of eaves, canopies, carports, and other commercial and residential exterior applications with indirect exposure to the weather. Soffit board is available in 1/2 or 5/8 -inch thicknesses with both regular and Type X core.
    Foil-backed gypsum board has aluminum foil laminated to the back surface of regular gypsum board or other gypsum panel products. Foil-backed panels serve as vapor barriers.
    Gypsum base for veneer plaster serves as a base for thin coats of hard, high strength gypsum veneer plaster.
    Gypsum liner board serves as a liner panel in shaft walls, stairwells, chase ways, area separation fire walls, and corridor ceilings. It has a special fire-resistant core encased in moisture-resistant paper. Liner board is available in ¾ or 1 -inch thicknesses, widths of 24 or 48 inches and with square edges (sometimes eased square edges). Gypsum liner board is also available with fiberglass mat facing that increases its weather and mold resistance.
    Gypsum sheathing is used as a protective fire resistive membrane under exterior wall surfacing materials such as wood siding, masonry veneer, stucco and shingles. It also provides protection against the passage of water and wind and adds structural rigidity to the framing system. The noncombustible core is surfaced with water repellent paper; in addition, it may also have a water resistant core. Available in 2 feet and 4 feet widths, ½ -inch and 5/8 -inch thick. It is also available with Type X core. Gypsum sheathing is also available with a glass mat facing. This product is more weather resistant and mold resistant than paper-faced gypsum sheathing, and it is often used as a substrate for Exterior Insulating Finishing Systems (EIFS).
    Impact-resistant gypsum panels offer greater resistance to the impact of solid objects from high traffic and vandalism than standard gypsum panels.
    Mold-resistant board incorporates various methods of preventing the growth of mold and mildew on the board’s surface.
    Non-paper-faced gypsum board is unfaced or has a facing other than paper.
    Regular gypsum board (gypsum wallboard) is used as a surface layer on walls and ceilings.
    Sag-resistant board is a ceiling panel that offers greater resistance to sagging than regular gypsum products used for ceilings where framing is typically spaced 24 inches o.c.
    Type C or Proprietary Type-X gypsum board is available in ½ -inch and 5/8 -inch thicknesses and is required in some fire rated assemblies. Additional additives give this product improved fire resistive properties.
    Type X gypsum board is available in ½ -inch and 5/8 -inch thicknesses and has an improved fire resistance made possible through the use of special core additives. It is also available with a predecorated finish. Type X gypsum board is used in most fire rated assemblies.
    Water-resistant gypsum board has a water resistant gypsum core and a water repellent paper. It serves as a base for ceramic or plastic wall tile or plastic finish panels in non-wet areas. This product is available with a regular or Type X core and in ½ -inch and 5/8 -inch thicknesses.
    Note: Do not use water-resistant gypsum board on ceilings or soffits unless extra framing is installed; do not exceed 12 inches o.c. between framing members. Do not use water-resistant gypsum board as a tile-backing substrate material where the final surface is directly exposed to running water; select one of several specialty products, including glass-mat-faced gypsum board or cement-based board, as a tile-backing substrate for areas directly exposed to running water.

    Tools

    Gypsum board installation and finishing require only some basic tools. While there are also many specialized hand and power tools available for gypsum board installation, here’s a list with brief descriptions of the basic tools necessary for a typical wallboard job:
    Measuring tape – A steel retractable measuring tape, usually 25 feet in length.
    Gypsum board T-square –Square edge for measuring and cutting gypsum board to length and for cutting out holes for square outlet boxes and other openings.
    Utility knife – Standard cutting tool with replaceable/reversible blades for scoring and cutting gypsum board.
    Hammer – Drives nails through gypsum board into wood framing.
    Keyhole saw – Small triangular saw for cutting out holes for outlet boxes, pipes, and other penetrations.
    Rasp – A tool for smoothing rough edges of wallboard after it has been scored and snapped.
    Assorted trowels and taping knives – Bladed tools for applying and smoothing tape and joint compound over joints and fastener heads.
    Mud tray – Box to contain joint compound while finishing joints and fastener heads.
    Sanding pole – Tool that enables sanding walls from floor to ceiling and standard height ceilings without the use of a ladder.
    Screw gun – Power tool that drives all types of gypsum board screws through gypsum board and into framing or substrate.

    Application Sequence:

    Use the following procedures to ensure a successful gypsum board application:

    1. Install ceiling panels first, then the wall panels.
    2. Once cut to size, position gypsum boards into place without forcing them.
    3. Match similar edges and ends, i.e.: tapered to tapered, square-cut ends to square ends.
    4. Plan to span the entire length of ceilings or walls with single boards if possible to reduce the number of butt joints, which are more difficult to finish. Stagger butt joints and locate them as far from the center of the wall and ceiling as possible so they will be inconspicuous.
    5. In a single-ply application, position all board ends and edges over parallel framing members to ensure that the joints are supported. (Exception: In a two-ply assembly, with adhesive between the plies, the ends and edges of face layers need not fall on supporting members.
    Take care to install mechanical and electrical equipment at the proper distance relative to the framing to allow for the gypsum board thickness so that the trim components, such as cover plates, registers, and grilles, fit correctly. Do not allow the depth of electrical boxes to exceed the framing depth and avoid placing boxes on opposite sides of a wall in the same stud cavity space. Avoid having electrical boxes, cabinets, and other devices penetrate completely through walls as this can be detrimental to sound isolation and fire resistance